twigs.

11 08 2011

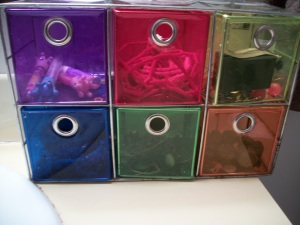
For years, I have kept my jewelry in this rainbow container.

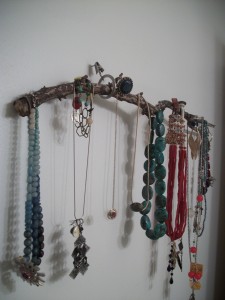
Last week, I realized that this very container could be a great tool in helping Miles to learn his colors. Great!  But, now my jewelry needed a new home.  I found this idea and knew it was something I had to try. I love having all of my favorites out in plain view. It makes accessorizing so much easier and fun!

You can easily make one of these, too. It just requires a twig or branch, a couple curtain rings and 2 nails.


fickle.

23 07 2011

Remember a couple of months ago when I painted some paintings for above our sofa? Well, I recently found a painting on Etsy that I loved. So, I just painted my own!

I like it 500000% more!


new addition.

1 06 2011

My parents are collectors. They collect all kinds of things. They are constantly buying and reselling antiques. Their home is a beautiful showcase of unique items they have found throughout the years. Occasionally I get to benefit from their inventory. If you’ve been to our house, you are probably well aware of the desk in the corner of the dining room that is (was) completely stacked with school supplies, books, papers and other random items. I have been looking for years for some sort of affordable cabinet to hide away all of my junk. I even begged the lady at the Salvation Army on more than one occasion to let me buy a cabinet there that was “just for display”.  It’s hard to believe, but my parents just happened to have this beauty just hanging out in the garage. It is truly amazing what one piece of furniture can do for your life! We no longer have a messy dining room.

I originally wanted a cabinet that I could paint orange, but this cabinet has such beautiful detail and wouldn’t look quite right painted. Since I still craved a pop of crazy color, I just lined the back of the cabinet with this fun wrapping paper!


the thing about ideas…

17 05 2011

The thing about ideas is, once I get one in my head- I must complete it! I have been known to decide to paint a room (or whole house) in the morning, go to the paint store immediately and paint all day and night until it is finished. I guess I’m dorky that way. Yesterday, I got an idea for new artwork. I uncovered fabric covered canvases and painted them during nap time. Here’s the finished product.


cheesy to chic.

10 01 2011

You know those cheesy butterflies that some people have hanging on the exterior of their homes? I remember being a little girl and wishing that my parents would get some of those awesome butterflies to hang on our house. That was the 80’s and even then, my parents thought they were tacky.

They were right. Now, you can find them if you really search…still adorning peoples homes. I think we’ve found a better use for those lovely creatures.

My sister in law, is an expert at thrifting. She will see something interesting in a thrift store and get a vision for it. She found a set of these butterflies and thought they would be great painted and hanging in Greta’s bedroom. She was right!

I think these butterflies are much happier here than hanging up on some sad beige siding 🙂


easy wall art.

6 10 2010

Step 1: Find a book of art prints that you LOVE. (library book sales are great for this)


Step 2: Find a frame! Old or new, anything will work.

Step 3: Cut the prints to fit your frame.

Step 4: Admire your new art work!


let the sunshine in.

10 08 2010

I love the fact that the house we live in is very bright. It really showcases our curtains nicely 🙂 Can you guess which curtains I made myself and which were bought? I’ll give you a hint…2 of them were bought. Did I mention that I love curtains?

A.

B.

C.

D.

E.


I love etsy.

4 06 2010

I love etsy.

Have I ever mentioned how much I love etsy?

I could spend hours and hours just looking at things.

Etsy is my favorite place to buy gifts for friends and family.

Every once and awhile I find something like this pillow (and buy it for myself!)

If you aren’t familiar with etsy, go visit! And the next time you need a unique gift for someone you will know exactly where to go!

P.S.- I think this lovely green pillow is the only one in my house that I didn’t make myself 🙂


House tour, 1 year later.

22 03 2010

The living room

BEFORE:

living

AFTER:

We painted the walls and got 2 new chairs. Now we have enough seating upstairs for me to start a ladies Bible study! Moved the artwork from the dining room into the living room.

The dining room

BEFORE:

dining

AFTER:

Painted the walls, hung a shelf we had in storage and hung our family tree.

Shot of the family tree that Joe got me for Valentine’s Day. It is not completed, but you get the idea. The colors coordinate perfectly!

The bathroom

No real change…

bath

Miles’ Room

BEFORE:

miles1miles2

AFTER:

Got a few storage cubes and you can see the evolution of his toys to “big boy” toys. His room will be the next to be painted.  I will also make curtains.

Greta’s Room

BEFORE:

img_3217img_3219

AFTER:

If you remember, we redecorated Greta’s room as her Birthday present.

Bedroom

No real changes…

img_32392

Kitchen

BEFORE:

img_32441img_3243

AFTER :

We painted!

Basement

No real changes…

img_3242

The lighting in the photos doesn’t really show the wall colors well, so here is a shot of the new colors side by side. You can really see the living room color better here (it is the background for the paint chips).



making a cross.

16 03 2010

I just looove etsy.  As I was looking at all of the interesting, hand-made treasures,  I got the idea that it might be a great place to find a unique cross for our entryway.  I did a search and began browsing.  This time, though, I did not find what I was looking for. The most interesting crosses I could find were made of wire and beads. As soon as I saw one, I remember that I had made one just like them  about a year and a half ago. So, instead of going online and shopping for the perfect cross for our entryway–I went into the basement, rifled through some boxes of stuff and  found the perfect cross for our entryway!

This cross was very easy to make. It is just thin wire (you can buy copper or silver on a spool at a hardware store) and beads from a craft store.  I used a couple of old pens and just wrapped them over and over with wire. Once the pens were covered, I started adding beads to the wire as I twisted and wrapped. Voila!